이전에 델리게이트를 배웠는데 델리게이트와 동일한 이벤트 라는것도 있다.
앞장들에서 배운 델리게이트는 파라미터용으로 주로 설명했고 이번에 이벤트는 서로 데이터를 주고받는데 최적화 된 내용으로 살펴보자.
이벤트와 델리게이트 차이점을 찾아보면 여러글들이 있는데 설명이 신통치않다.
이래저래 내용을 찾아보다보면 결국 같은거라는 생각이 드는데 아래 글에서 이야기한 내용을 한번 읽어보자.
https://www.sysnet.pe.kr/Default.aspx?mode=3&sub=0&pageno=0&detail=1&wid=5375
이벤트와 델리게이트의 차이가 궁금합니다.
이벤트와 델리게이트의 차이가 궁금합니다. [링크 복사], [링크+제목 복사] 조회: 3477 글쓴 사람 영귤 홈페이지 첨부 파일 부모글 보이기/감추기 C# 8.0 248 페이지에, event 의 위력이 발휘될 차례라
www.sysnet.pe.kr
앞장 유저컨트롤에서 사용하던 예제를 다시 생각해보자.
|
1
2
3
4
5
6
7
8
9
10
11
12
13
14
15
16
17
18
19
20
21
22
23
24
25
26
27
28
29
30
31
32
33
34
35
36
37
38
39
40
41
42
43
44
45
46
47
48
49
50
51
52
53
54
55
56
57
58
59
60
61
62
63
|
using System;
using System.Collections.Generic;
using System.ComponentModel;
using System.Drawing;
using System.Data;
using System.Linq;
using System.Text;
using System.Threading.Tasks;
using System.Windows.Forms;
using System.Threading;
namespace WindowsFormsControlLibrary1
{
public partial class UserControl1: UserControl
{
private bool _start = false;
public bool start
{
set
{
_start = value;
if (_start)
{
label2change();
_start = false;
}
}
}
public UserControl1()
{
InitializeComponent();
label1.Text = "_";
}
public async void label2change()
{
await Task.Run(() =>
{
for (int i = 1; i <= 45; i++)
{
Thread.Sleep(50);
label_text_change(label1, i.ToString());
}
});
label_text_change(label1, new Random().Next(45).ToString());
}
public void label_text_change(Label lb, string i)
{
if (lb.InvokeRequired)
{
lb.Invoke((Action)delegate () { lb.Text = i; });
}
else
{
lb.Text = i;
}
}
}
}
|
cs |
유저컨트롤 부분인데 외부에서 특정 신호나 어떠한것이 호출되면 시작하도록 만들었었다.
여기에 이벤트를 달아보자.
이벤트는 약간 반대로 호출되는 느낌이 있는데 생각보다 자주 사용된다.
이벤트는 간단하게 생각하면
보내는 쪽에서 이벤트가 발생했다는 자체의 액션이 발생하면
사용하는쪽에서 이벤트가 발생할경우 어떤행동을 할것인가 지정해주는 형태
로 만들어준다.
앞장에서 만든 유저컨트롤을 약간 수정해보자.
버튼을 누르고 숫자가 바뀌는도중에 또 버튼을 누르면 내가 생각한것처럼 작동하지 않을것이다.
버튼을 누르면 버튼이 비활성화 되고 숫자가 다 바뀌고 마지막 숫자까지 변경이 완료되면 다시 버튼이 활성화 되게 이벤트를 사용해서 만들어보자.
UserControl 소스
|
1
2
3
4
5
6
7
8
9
10
11
12
13
14
15
16
17
18
19
20
21
22
23
24
25
26
27
28
29
30
31
32
33
34
35
36
37
38
39
40
41
42
43
44
45
46
47
48
49
50
51
52
53
54
55
56
57
58
59
60
61
62
63
64
65
66
67
68
69
70
71
72
73
74
75
76
77
78
79
80
81
82
83
84
85
86
87
88
89
90
|
using System;
using System.Collections.Generic;
using System.ComponentModel;
using System.Drawing;
using System.Data;
using System.Linq;
using System.Text;
using System.Threading.Tasks;
using System.Windows.Forms;
using System.Threading;
namespace WindowsFormsControlLibrary1
{
public partial class UserControl1: UserControl
{
public delegate void startchangedHandler(bool start);
public event startchangedHandler startchanged;
public delegate void numberchangeendHandler();
public event numberchangeendHandler numberchangeend;
public event EventHandler numberchangeend2;
private bool _start = false;
public bool start
{
set
{
_start = value;
if (_start)
{
label1change();
}
if (startchanged != null)
startchanged(_start);
}
}
public UserControl1()
{
InitializeComponent();
label1.Text = "_";
}
public async void label1change()
{
await Task.Run(() =>
{
for (int i = 1; i <= 45; i++)
{
Thread.Sleep(50);
label_text_change(label1, i.ToString());
}
});
label_text_change(label1, new Random().Next(45).ToString());
if(numberchangeend != null)
numberchangeend();
if (numberchangeend2 != null)
numberchangeend2(this, EventArgs.Empty);
}
public void label_text_change(Label lb, string i)
{
if (lb.InvokeRequired)
{
lb.Invoke((Action)delegate () { lb.Text = i; });
}
else
{
lb.Text = i;
}
}
}
public class startchangeEventArgs : System.EventArgs
{
public readonly bool _start;
public startchangeEventArgs(bool start)
{
_start = start;
}
}
}
|
cs |
호출하는쪽소스
|
1
2
3
4
5
6
7
8
9
10
11
12
13
14
15
16
17
18
19
20
21
22
23
24
25
26
27
28
29
30
31
32
33
34
35
36
37
38
39
40
41
42
43
44
45
46
47
48
49
50
51
52
53
54
55
56
57
58
59
60
61
62
63
64
65
66
67
68
69
70
71
72
|
using System;
using System.Collections.Generic;
using System.ComponentModel;
using System.Data;
using System.Drawing;
using System.Linq;
using System.Text;
using System.Threading.Tasks;
using System.Windows.Forms;
namespace WindowsFormsApp13
{
public partial class Form13 : Form
{
public Form13()
{
InitializeComponent();
}
private void button1_Click(object sender, EventArgs e)
{
//userControl11.startchanged += UserControl11_startchanged1;
userControl11.startchanged += callfunc;
userControl11.numberchangeend += endfunc;
userControl11.numberchangeend2 += endfunc2;
userControl11.numberchangeend2 += (ss,ee) => { endfunc2_1("test"); };
userControl11.start = true;
}
private void callfunc(bool start)
{
MessageBox.Show(start.ToString());
button1.Enabled = false;
}
private void endfunc()
{
button1.Enabled = true;
}
private void endfunc2(object sender, EventArgs e)
{
MessageBox.Show("Test2");
}
private void endfunc2_1(string str)
{
MessageBox.Show(str);
}
private void UserControl11_startchanged(bool start)
{
userControl12.start = true;
}
private void button2_Click(object sender, EventArgs e)
{
userControl12.start = true;
}
private void button3_Click(object sender, EventArgs e)
{
userControl13.start = true;
}
}
}
|
cs |
유저컨트롤쪽 소스부터 어떻게 바뀐건지 살펴보자.
버튼을 눌러 유저컨트롤쪽 액션이 시작되기전에 버튼을 비활성화 시키기 위해 startchanged 이벤트를 추가 해줬다.
public delegate void startchangedHandler();
public event startchangedHandler startchanged;
이벤트는 위와같이 델리게이트정의하고 그 형식을 가지는 event 를 하나 만들어줘서 호출해주면 된다.
호출할때는 아래와같이 null 체크를 해줬다.if (startchanged != null)
startchanged();사용할때 += 로 이벤트에 뭔가를 연결해주면 null 이 아닌상태가 된다.
호출하는쪽소스에서는 userControl11.startchanged += callfunc; 이런식으로 이벤트가 발생하면 callfunc 함수를 호출하라고 구현해놨다.
callfunc 함수는 이벤트의 델리게이트가 bool 파라미터를 하나 받는 형태이기때문에 똑같이 파라미터를 하나 받게 구현해줬다.
저런형태도 가능하다 보여주는것이기때문에 따로 해당변수를 어딘가 사용하지는 않았다.
호출하는쪽 소스에서 이벤트연결하는부분에 있는 주석 //userControl11.startchanged += UserControl11_startchanged1;
처럼 자동으로 만들어지는 함수를 사용해도 되는데 callfunc 처럼 직접 이름을 지정해서 만들어서 사용해도 상관없다.
callfunc 에서 버튼을 비활성화 시켜주었다.
--------------------------------------------------------------------------------------------------------------------------------
한줄로 설명하면 _start 변수가 변경되면 startchanged 이벤트 실행되게 만들어놓고 이벤트 실행하는 쪽에서는 해당 이벤트에 임의의 함수등록해두면 _start 변수가 변경되면 임의로 등록한 함수가 실행되는 내용이다.
--------------------------------------------------------------------------------------------------------------------------------
행동들이 끝난후 버튼 활성화도 똑같은형태다.
numberchangeend 이벤트를 UserControl 소스 에서 만들고 label1change 함수의 내용이 끝난후 호출해줬다.
그리고나서 호출하는쪽소스 에서 userControl11.numberchangeend += endfunc; 이벤트를 연결해줬다.
그리고 endfunc 함수에는 버튼을 다시 활성화 시키는 소스를 넣어줬다.
이렇게 하고 실행하면 처음 생각한것처럼 버튼을 누르는 순간 버튼은 비활성화 되고 작업이 끝난 시점에서 다시 활성화 되는걸 볼수 있다.
유저컨트롤쪽 소스에 있는 public event EventHandler numberchangeend2; 형태처럼 델리게이트를 따로 정의 하지 않고 기본정의 되어있는 EventHandler 델리게이트를 사용할 수도 있다.
이런경우
if (numberchangeend2 != null)
numberchangeend2(this, EventArgs.Empty);
처럼 파라미터 없이 호출하는 형태로 호출 할 수 있다.
만약 위 형태에서 EventArgs.Empty 가 아닌 파라미터를 넘기고 싶다면 EventArgs 를 상속하는 클래스를 만들어서 넘겨 줄수도 있다.
하지만 그렇게 할경우 호출하는쪽에서도 해당 클래스를 객체화해서 받아서 사용해야 되기 때문에 여러가지로 번거로워 진다.
이벤트 발생하는쪽에서 파라미터를 넘겨야 하는 경우는 startchangedHandler 처럼 이벤트 발생하는쪽에서 델리게이트를 만드는게 여러모로 더 편한것 같다.
단, 그렇게 할경우는 어떤 파라미터가 넘어가는지 문서등으로 공유되어야 이벤트를 사용하는쪽에서도 정확하게 사용할 수가 있다.
어째뜬 numberchangeend2 의 경우는 기본형태의 이벤트 핸들러인 object sender , EventArgs e 형태의 파라미터로 넘겨야 하기때문에 numberchangeend2(this, EventArgs.Empty); 형태로 호출을 했다.
sender 파라미터에 this 를 넣었는데 별다른 의미는 없다.sender 는 대부분의 경우 이벤트를 발생한 객체 자체로 생각하고 사용되기 때문에 자신을 의미하는 this 를 파라미터로 넘긴 내용이다.받는쪽에서는
private void endfunc2(object sender, EventArgs e)
{
MessageBox.Show("Test2");
}
이런형태로 구현을 했는데 기본 EventHandler 델리게이트를 사용하여 이벤트를 발생했기때문에 이렇게 받은 내용이다.
이벤트 발생을 numberchangeend2(this, EventArgs.Empty); 와 같이 했기때문에 받는쪽 함수의 파라미터인 EventArgs e 에는 당연히 아무 내용이 없다.이벤트 생성쪽마지막줄 내용 userControl11.numberchangeend2 += (ss,ee) => { endfunc2_1("test"); }; 이 부분은 람다식으로 파라미터를 추가로 넘기면서 호출 할 수도있다는 내용을 예제로 만들어본 부분이다.
위예제를 한장 이미지로 설명하면 아래 그림1과 같다.

하나더 예제를 보며 좀더 감을 잡고 표준이벤트에 대해서도 같이 알아보자.
스캔을 하는 프로그램을 만든다고 가정하자.
스캔은 부가적인 기능이고 엑셀을 작성하거나 여러기능을 수행하면서 스캔버튼도 있는 프로그램이라고 가정하자.
스캐너가 작동하는 대부분의 기능은 장비업체에서 DLL 로 제공할것이고 , 우리는 그 DLL 을 참조하여 작동하는 프로그램을 만들것이다.
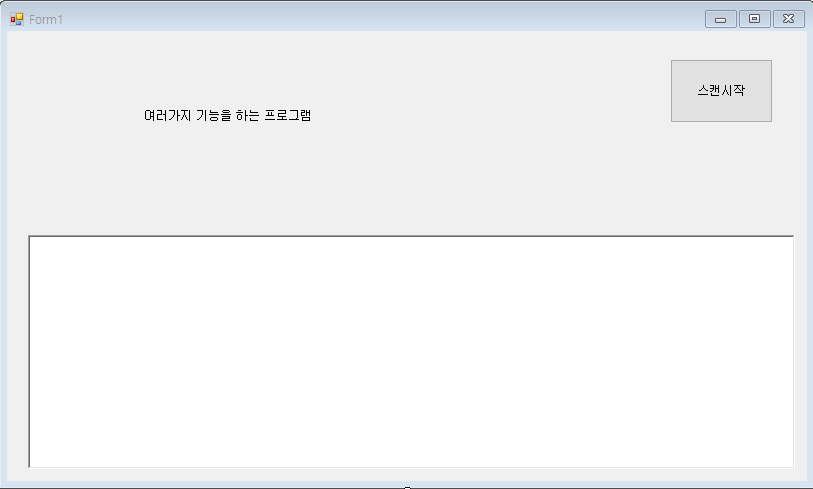
[Form1]
|
1
2
3
4
5
6
7
8
9
10
11
12
13
14
15
16
17
18
19
20
21
22
23
24
25
26
27
28
29
30
31
32
33
34
35
36
37
38
39
40
41
42
|
using System;
using System.Collections.Generic;
using System.ComponentModel;
using System.Data;
using System.Drawing;
using System.Linq;
using System.Text;
using System.Threading.Tasks;
using System.Windows.Forms;
namespace WindowsFormsApp7
{
public partial class Form1 : Form
{
Getimage _getimage = new Getimage();
public Form1()
{
InitializeComponent();
_getimage._getimagedelegate += _getimage__getimagedelegate;
}
private void btnStartScan_Click(object sender, EventArgs e)
{
_getimage.startscan();
}
private void _getimage__getimagedelegate(string imgname)
{
WriteLog($"현재받아온 이미지는 {imgname} 입니다.");
}
private void WriteLog(string str)
{
if(richTextBox1.InvokeRequired)
richTextBox1.Invoke((Action)(() => { richTextBox1.Text += str + Environment.NewLine; }));
else
richTextBox1.Text += str + Environment.NewLine;
}
}
}
|
cs |
[GetImage]
|
1
2
3
4
5
6
7
8
9
10
11
12
13
14
15
16
17
18
19
20
21
22
23
24
25
26
27
28
29
30
31
32
33
34
35
36
37
38
39
40
41
42
|
#define calldelegate2
using System;
using System.Collections.Generic;
using System.Linq;
using System.Text;
using System.Threading;
using System.Threading.Tasks;
namespace WindowsFormsApp7
{
class Getimage
{
public delegate void getimagedelegate(string imgname);
public event getimagedelegate _getimagedelegate;
/// <summary>
/// 사용자가 스캔버튼을 누름
/// </summary>
public async void startscan()
{
await Task.Run(() =>
{
//외부 DLL 에서 스캔함수를 가져와서 호출해서 사용한다.
//그외 여러작업을 한다.....
Thread.Sleep(1000);//가상의 외부함수작동 시간
string imagename = new Random().Next(1000).ToString() + " 이미지"; //외부함수에서 스캔된 이미지 임시이름이 넘어왔다!
//작업이 완료되면 이벤트를 호출해서 알려준다.
#if calldelegate1
if (_getimagedelegate != null)
_getimagedelegate(imagename);
#elif calldelegate2
_getimagedelegate?.Invoke(imagename);
#endif
});
}
}
}
|
cs |
[Form1] 의 스캔시작 버튼을 누르면 _getimage.startscan(); 를 호출한다.
스캔을 하는동안 동기적으로 화면이 잠기면 안되기 때문에 [GetImage] 의 startscan 함수를 보면 새 쓰레드에서 작업을 작동하게 만들었다.
이함수에서는 외부DLL 을 호출하여 해당 DLL 의 여러 함수들을 호출해 이미지를 받아올것이다.
그리고 작업이 완료 되면 [GetImage] 에서 _getimagedelegate?.Invoke(imagename); 이벤트를 호출해서 작업완료를 호출한곳에 알려주게 된다.(참고로 calldelegate1 과 calldelegate2 는 완전 동일하다.)
그러면 [Form1] 의 _getimage__getimagedelegate 가 호출되게 된다.
물론 [Form1] 에서 _getimage._getimagedelegate += _getimage__getimagedelegate; 이와 같이 이벤트를 등록해놔서 호출되게 되는것이다.
이정도면 이벤트의 필요성과 사용법은 충분히 알았으리라고 생각한다.
아래 표준이벤트를 추가한 예제도 보자.
위 예제에서 표준이벤트 부분만 추가한 예제인데 쉽게 알수 있을거라고 생각한다.
_getimageEventHandler2 가 표준이벤트 이다.
[Form1]
|
1
2
3
4
5
6
7
8
9
10
11
12
13
14
15
16
17
18
19
20
21
22
23
24
25
26
27
28
29
30
31
32
33
34
35
36
37
38
39
40
41
42
43
44
45
46
47
48
49
50
51
52
53
54
|
using System;
using System.Collections.Generic;
using System.ComponentModel;
using System.Data;
using System.Drawing;
using System.Linq;
using System.Text;
using System.Threading.Tasks;
using System.Windows.Forms;
namespace WindowsFormsApp7
{
public partial class Form1 : Form
{
Getimage _getimage = new Getimage();
public Form1()
{
InitializeComponent();
_getimage._getimagedelegate += _getimage__getimagedelegate;
_getimage._getimageEventHandler1 += _getimage__getimageEventHandler1;
_getimage._getimageEventHandler2 += _getimage__getimageEventHandler2;
_getimage._getimageEventHandler3 += _getimage__getimageEventHandler3; }
private void _getimage__getimageEventHandler1(object sender, EventArgs e)
{
WriteLog($"_getimage__getimageEventHandler1 - 이미지받아오기가 완료됨");
}
private void _getimage__getimageEventHandler2(object sender, GetimageEventArgs e) {
WriteLog($"_getimage__getimageEventHandler2 - 현재받아온 이미지는 {e._name} 입니다.");
}
private void _getimage__getimageEventHandler3(object sender, string e)
{
WriteLog($"_getimage__getimageEventHandler3 - 현재받아온 이미지이름은 {e} 입니다.");
}
private void btnStartScan_Click(object sender, EventArgs e)
{
_getimage.startscan();
}
private void _getimage__getimagedelegate(string imgname)
{
WriteLog($"_getimage__getimagedelegate - 현재받아온 이미지는 {imgname} 입니다.");
}
private void WriteLog(string str)
{
if(richTextBox1.InvokeRequired)
richTextBox1.Invoke((Action)(() => { richTextBox1.Text += str + Environment.NewLine; }));
else
richTextBox1.Text += str + Environment.NewLine;
}
}
}
|
cs |
|
|
|
[GetImage]
|
1
2
3
4
5
6
7
8
9
10
11
12
13
14
15
16
17
18
19
20
21
22
23
24
25
26
27
28
29
30
31
32
33
34
35
36
37
38
39
40
41
42
43
44
45
46
47
48
49
50
51
52
53
54
55
56
57
58
59
60
61
62
63
64
65
66
67
68
69
70
71
72
73
74
|
#define calldelegate2
using System;
using System.Collections.Generic;
using System.Drawing;
using System.Linq;
using System.Text;
using System.Threading;
using System.Threading.Tasks;
namespace WindowsFormsApp7
{
class Getimage
{
public delegate void getimagedelegate(string imgname);
public event getimagedelegate _getimagedelegate;
public event EventHandler _getimageEventHandler1;
public event EventHandler<GetimageEventArgs> _getimageEventHandler2;
public event EventHandler<String> _getimageEventHandler3; /// <summary>
/// 사용자가 스캔버튼을 누름
/// </summary>
public async void startscan()
{
await Task.Run(() =>
{
//외부 DLL 에서 스캔함수를 가져와서 호출해서 사용한다.
//그외 여러작업을 한다.....
Thread.Sleep(1000);//가상의 외부함수작동 시간
string imagename = new Random().Next(1000).ToString() + " 이미지"; //외부함수에서 스캔된 이미지 임시이름이 넘어왔다!
//작업이 완료되면 이벤트를 호출해서 알려준다.
#if calldelegate1
if (_getimagedelegate != null)
_getimagedelegate(imagename);
#elif calldelegate2
_getimagedelegate?.Invoke(imagename);
#endif
//간편호출
_getimageEventHandler1?.Invoke(this, EventArgs.Empty);
#region 표준 이벤트 구현
//파라미터로 넘길 클래스 객체
GetimageEventArgs getimageEventArgs = new GetimageEventArgs();
getimageEventArgs._name = new Random().Next(1000).ToString() + " 이미지";
getimageEventArgs._bitmap = new Bitmap(10, 10);
_getimageEventHandler2?.Invoke(this, getimageEventArgs);
_getimageEventHandler3?.Invoke(this, getimageEventArgs._name); #endregion
});
}
}
/// <summary>
/// 파라미터로 넘길 클래스, 기본 이벤트 파라미터 클래스인 EventArgs 를 상속받아야한다.
/// </summary>
public class GetimageEventArgs : EventArgs
{
public string _name;
public Bitmap _bitmap;
}
}
|
cs |
참고로 ? 연산자에 대해서는 아래글을 읽어보자.
https://error999.tistory.com/22
C# - 물음표 연산자(?, ??), 삼항연산자
코드를 작성할 때 null 처리와 단순 if else 조건을 처리할 때 '단순한 조건때문에 줄을 더 써야하나?' 라고 생각할 수 있습니다. 아주 간단한 조건인데도 불구하고 한줄로 쓸 수 있는 코드에 4줄이
error999.tistory.com
추가적으로 이벤트 콜백에 대해 살펴보자.
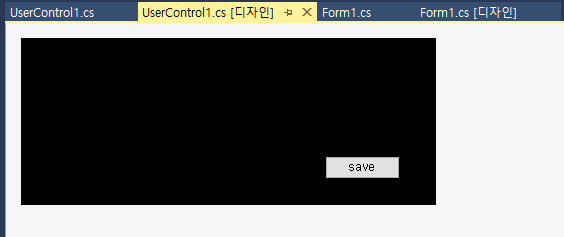
위와 같이 유저컨트롤을 하나 만들고 해당 유저컨트롤을 폼에 올렸다.
추후에 재사용을 편하게 하기 위해 save 나 여러 기능을 가진 유저컨트롤을 만들었다고 생각하자.
그런데 모든 내용을 유저컨트롤에 넣으면 다른곳에서 사용하려면 또 수정해줘야 하는 경우가 있기 때문에 외부의 특정값을 받아 저장하는 기능을 만들고 있다고 생각하자.
가만히 생각해보면 위에서 학습한 내용만 제대로 이해 됐다면 별로 어려울건 없다.
소스를 보자.
UserControl1.cs
|
1
2
3
4
5
6
7
8
9
10
11
12
13
14
15
16
17
18
19
20
21
22
23
24
25
26
27
28
29
30
31
32
33
34
35
36
37
38
39
40
41
42
43
44
|
using System;
using System.Collections.Generic;
using System.ComponentModel;
using System.Drawing;
using System.Data;
using System.Linq;
using System.Text;
using System.Threading.Tasks;
using System.Windows.Forms;
namespace WindowsFormsApp2
{
public partial class UserControl1 : UserControl
{
public event EventHandler<paramclass> saveaction;
public UserControl1()
{
InitializeComponent();
}
private void btn_save_Click(object sender, EventArgs e)
{
paramclass p = new paramclass();
saveaction?.Invoke(this, p);
MessageBox.Show($"{p.data1},{p.data2},{p.data3}");
save();
}
private void save()
{
//실제 save 작업할 내용
}
}
public class paramclass
{
public string data1;
public string data2;
public string data3;
}
}
|
cs |
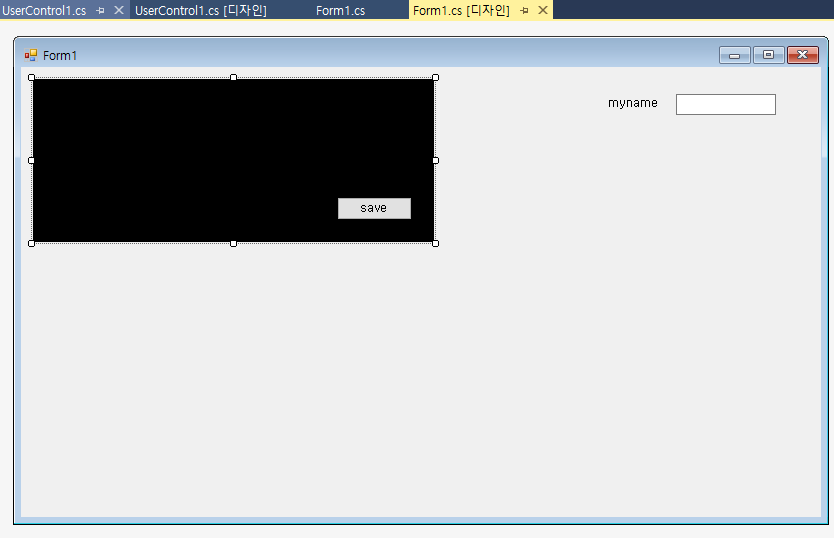
Form1.cs
|
1
2
3
4
5
6
7
8
9
10
11
12
13
14
15
16
17
18
19
20
21
22
23
24
25
26
27
28
29
30
|
using System;
using System.Collections.Generic;
using System.ComponentModel;
using System.Data;
using System.Drawing;
using System.Linq;
using System.Text;
using System.Threading.Tasks;
using System.Windows.Forms;
namespace WindowsFormsApp2
{
public partial class Form1 : Form
{
public Form1()
{
InitializeComponent();
userControl11.saveaction += UserControl11_saveaction;
}
private void UserControl11_saveaction(object sender, paramclass e)
{
e.data1 = txtmyname.Text;
e.data2 = "test";
e.data3 = "testing";
}
}
}
|
cs |
정말 간단하다.
이벤트하나 만들어서 save 버튼에 연결해주고
외부의 값은 class 로 파라미터 넘겨서 외부에서 그 class 의 값을 변경해주고
변경된 class 를 이벤트를 생성한 원래의 본체에서 읽어와서 뭔가 액션을 해주면 된다.
어차피 class 를 파라미터로 넘기면 참조값이 전달되기때문에 따로 콜백에 대해 신경쓸 필요도 없이 그냥 사용해버리면 된다.
그런데 이 방식은 동기방식이다.
다음 수정된 소스를 다시 확인해보자.
Form1.cs 는 그대로 이고 USerControl1.cs 만 변경됐다.
UserControl1.cs
|
1
2
3
4
5
6
7
8
9
10
11
12
13
14
15
16
17
18
19
20
21
22
23
24
25
26
27
28
29
30
31
32
33
34
35
36
37
38
39
40
41
42
43
44
45
46
47
48
49
50
51
52
53
54
55
56
57
58
59
60
61
62
63
64
65
66
67
68
69
70
|
using System;
using System.Collections.Generic;
using System.ComponentModel;
using System.Drawing;
using System.Data;
using System.Linq;
using System.Text;
using System.Threading.Tasks;
using System.Windows.Forms;
using System.Runtime.Remoting.Messaging;
namespace WindowsFormsApp2
{
public partial class UserControl1 : UserControl
{
public event EventHandler<paramclass> saveaction;
public UserControl1()
{
InitializeComponent();
}
private void btn_save_Click(object sender, EventArgs e)
{
#if false //동기 방식으로 호출
paramclass p = new paramclass();
saveaction?.Invoke(this, p);
MessageBox.Show($"{p.data1},{p.data2},{p.data3}");
save();
#else //비동기 방식으로 호출
paramclass p = new paramclass();
saveaction?.BeginInvoke(this, p, savebtncallback, p);
#endif
}
private void savebtncallback(IAsyncResult IasyncResult)
{
AsyncResult asyncResult = IasyncResult as AsyncResult;
paramclass p = asyncResult.AsyncState as paramclass;
MessageBox.Show($"{p.data1},{p.data2},{p.data3}");
save();
//대기 핸들은 EndInvoke를 호출할 때 자동으로 닫히지 않습니다.
//대기 핸들에 대한 모든 참조를 해제하면 가비지 수집에서 대기 핸들을 회수할 때 시스템 리소스가 확보됩니다.
//대기 핸들 사용을 마친 후 시스템 리소스를 즉시 확보하려면 WaitHandle.Close 메서드를 호출하여 핸들을 삭제합니다.
//삭제 가능한 개체를 명시적으로 삭제하면 가비지 수집의 효율성이 향상됩니다.
asyncResult.AsyncWaitHandle.Close();
//사용하는 방법에 관계없이 항상 EndInvoke 를 호출하여 비동기 호출을 완료해야 합니다.
(asyncResult.AsyncDelegate as EventHandler<paramclass>).EndInvoke(IasyncResult);
}
private void save()
{
//실제 save 작업할 내용
}
}
public class paramclass
{
public string data1;
public string data2;
public string data3;
}
}
|
cs |
위 소스에서 실제로 비동기로 이벤트 핸들러 호출하는 부분은 아래에 있는 내용이다.

파라미터를 하나씩 살펴보자.
첫번째 두번째는 위에서 다 설명한 내용이라 생략한다.
세번째 AsyncCallback 는 다음 그림을 보자
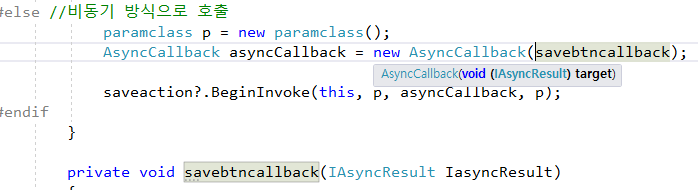
그림2를 보면 AsyncCallback 델리게이트에서 파라미터로 void 를 반환하고 IAsyncResult 를 파라미터로 받는 함수를 요구하고 있는것을 알수 있다.
그래서 동일한 형태의 함수를 만들어 AsyncCallback 의 파라미터로 넘겨주고 해당 AsyncCallback 을 BeginInvoke 의 파라미터로 넘겨주면 된다.
또는 위에서 만든 예제처럼 해당형태의 함수명을 바로 넘겨줘도 된다.
그렇게 하면 이벤트를 호출한곳에서 액션이 완료된 시점에 콜백함수가 호출되는것을 확인할 수 있다.
네번째 파라미터인 object 같은 경우는 콜백함수의 파라미터인 IAsyncResult 에 들어있는데 콜백함수에서 해당 값을 받아 사용하기 위해 넘겨준 내용이다.
결론적으로 UserControl1.cs 의 소스에서 보면
paramclass p = new paramclass(); 로 객체를 만들어 이 객체를
Form1.cs 의 private void UserControl11_saveaction(object sender, paramclass e) 여기서 파라미터로 받아서 사용하고
UserControl1.cs 의 private void savebtncallback(IAsyncResult IasyncResult) 에서 다시 콜백으로 받아 사용하게 되는것이다.
콜백함수에서는 IAsyncResult.AsyncState 로 해당객체를 받아서 사용할수 있다.
그리고 콜백함수내에서는 AsyncWaitHandle.Close 와 EndInvoke 를 필수적으로 해줘야 한다.
다음 문서를 참조하자
동기 메서드를 비동기 방식으로 호출
BeginInvoke 및 EndInvoke 메서드를 사용하여 .NET에서 동기 메서드를 비동기적으로 호출하는 방법을 알아봅니다.
docs.microsoft.com
***숙제 : 유저컨트롤을 하나 만들고 호출하는쪽과 이벤트로 데이터를 조작하는 아무 예제나 만들어보자.
'[ Program ] > c#스터디' 카테고리의 다른 글
| 62.네트워크프로그램 (0) | 2022.05.20 |
|---|---|
| 60. 유저컨트롤 (0) | 2022.05.17 |
| 59. lock / Monitor / Mutex (0) | 2022.05.11 |
| 58. Threadpool / BackgroundWorker / Parallel (0) | 2022.05.11 |
| 57. async / await (0) | 2022.03.29 |


댓글